
Class Schedule Report with Roster Details
Last edit date: 1/29/2026
Audience: Faculty and Staff
Purpose: This guide explains how to access and use the Class Schedule Report to view course sections and student roster details for a selected term.
| Contents |
|---|
| Navigation |
| Select Filters |
| View Class Sections and Roster Details |
| Advanced Filter Options |
| Order Columns |
| Export Results |
Navigation
- Login to RamPortal using your WCU Single Sign On (SSO).
- Select the menu icon (☰) in the top left corner of the page.
- Click on Reporting and select Class Schedule Report in the dropdown (Fig 1).
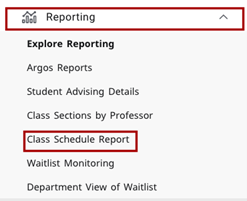
Fig. 1 - Use Single Sign-On
When the Evisions window opens, do not enter your username and password. Click on Use Single Sign-On at the bottom of the window (Fig. 2)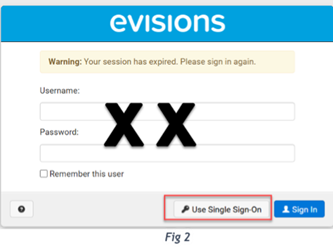
Fig. 2
Select Filters
Use the filters at the top of the page to define your results (Fig. 3).
- Select the Term from the dropdown menu.
- Use the available filters such as College, Department, Subject, and Course to refine your results.
Note: Course options become available after selecting a College, Department, and Subject. - Select Include Cancelled Sections to view cancelled sections in your results (Fig. 3).
- Click Search.

Fig. 3
View Class Sections and Roster Details
- Review the course sections listed in the Course Sections block (Fig 4).
- Scroll within the results area to view additional columns and rows.
- Select a column header to sort by that column.
- Select a course row to view enrollment details for that section.
- The Section Enrollment block updates to display enrollment details for the selected course (Fig. 4).
- By default, only students currently registered for the selected course are displayed.
Choose Include All Registration Statuses to view students who may have dropped or withdrawn.
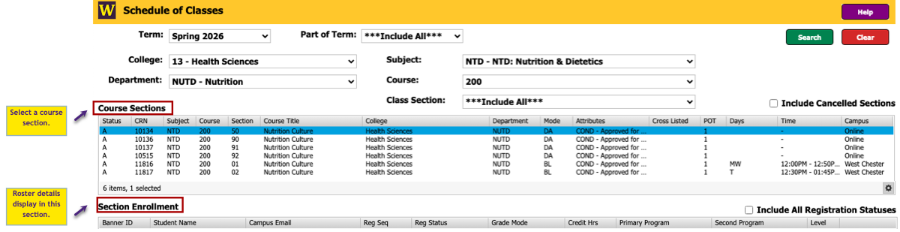
Fig. 4
Advanced Filter Options
- Select the gear icon in the bottom-right corner of the results area and choose Filter.
- Select a field from the Available fields dropdown.
- Choose an Operator, such as =, contains, starts with.
- Enter a Value.
- Select the plus (+) icon to add the filter.
- Add additional filters as needed, then select Apply to update the results.
- To remove a filter, select the x at the end of the row.
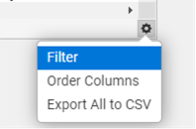
Fig. 5
Order Columns
- Select the gear icon and choose Order Columns (Fig. 5).
- Click and drag column headers to change the display order.
- Select Apply to save changes.
Export Results
- Select the gear icon and choose Export All to CSV.
- Review and adjust the fields to include in the export, then select Apply.
- The exported file will download and can be opened in Excel.
For additional assistance, submit a ticket for support.